Serverless policy
This framework is used to scale the resources of a container, or a group of containers, both dynamically and in real time, so that the limits placed on such resources can evolve over time. If we want to implement a serverless environment, then such resource limits will have to change to be placed just above the usage.
On the one hand, from a traditional virtual machine and Cloud perspective, this approach is similar to the on-demand and pay per usage resource provisioning, with the main difference being that on this case, the limits can be changed multiple times during execution instead of being specified only once at the instantiation phase.
On the other hand, this approach is also really close to the 'original' serverless paradigm, as the container and all the processes running on it can not trust the pool of resources exposed to them. Such resources limits can vary according to the usage the containers make fo them (e.g., if the CPU usage increases, the CPU limit should also be raised via adding more cores).
Combining both of these approaches, this framework comes up with a policy so that that software containers (e.g., LXC, Docker), can benefit from having a resource management that implements a serverless scenario.
Among other perks, the main benefits of this framework and of using the serverless policy include:
-
Higher resource utilization. If the containers have a low resource usage, they are given a smaller set of resources. If they have a higher usage, they are given a larger set. This allows to provision the resources more efficiently and increase their utilization ratio (used / allocated).
-
Pay per 'real' usage billing policy, only the used resources are considered when billing, and by used we mean the actually consumed by the containers, not the allocated ones.
-
Flexibility of the containers. Considering that containers can be highly similar to virtual machines when it comes to the virtualization environment exposed, they can be used to deploy a wider range of applications if compared to more traditional serverless solutions.
Objective
The main objective of this policy is to adjust the resource limit, that is, the amount of a resource that a container is given, so that such limit is not far away of the real resource usage. If such limit is way higher than the usage, we can talk of an underutilized resource scenario, while if the limit is close to the usage, there is a bottleneck.
When using this policy, the framework makes a best-effort to keep a balance between both scenarios, as if the allocated amount of resource is set too close to the usage, any unexpected increase will face a bottleneck, while if set too high, all the unused amount is lost considering that in the serverless paradigm only the used resources are billed.
How the policy works
In order to better see how this policy achieves its goal, we can study an example of several scaling operations taking place on a time window.

First, in the image it can be seen that there are:
- A time series that varies (orange), this time series represents the container aggregated resource usage, in this case of CPU.
- Three varying thresholds (dashed lines), which, from top to bottom, represent the resource allocated amount and the upper and lower boundaries (more on this later).
- Three colored areas (blue, green and ochre), which represent the areas between the previously mentioned thresholds.
- Two horizontal lines that do not vary, which represent the resource maximum and minimum limits. The maximum would be equivalent to the initial allocated resources on a traditional instance, while the minimum would represent the least amount of resources that we will grant the container.
As previously stated, the Serverless Containers framework looks for a balance when it comes to setting an appropriate allocated resource amount, continuously responding to the resource usage variations. Such response can be seen in the several scaling operations that take place, such as at seconds 70 (down), 270 (up) and 420 (down).
In order to detect the conditions that trigger these scaling requirements, two limits (or boundaries) are used:
- Upper limit, which defines a threshold that, once surpassed, signals for a need to scale up the allocated resource limit to avoid any future bottleneck.
- Lower limit, which triggers a scale down of the allocated resource amount once the usage falls below the boundary.
Thus, it is easy to see that if the thresholds are considered, the first and third scaling operations were caused because the resource usage fell under the lower boundary, while the second was caused because it surpassed the upper boundary.
Resource utilization
It is interesting to note how important it is to keep a balance that does not impose a bottleneck but also stays close to the real resource usage. As previously stated, the serverless paradigm differs from the Cloud IaaS paradigm in that the resource limits can be modified multiple times over time, instead of just defining such limit once at the startup.
Moreover, if we consider that the user of a serverless platform typically does not specify such resource requirements and that the billed resources are only the used ones, the task of properly scaling and setting limits becomes a crucial one which falls to the provider.
Because of these reasons it is important to define a key ratio, the resource utilization, which can be easily obtained from the amount of used and the allocated resources. The next image shows the previously used time window but with areas as the focus of the study.

We can see that there are three areas:
- Used area (dots), which represents the amount of resources used by the container.
- Allocated area (waves), representing the changing amount of resources assigned to this container via the scaling operations.
- Reserved area (stripes), which represents the theoretical limit of resources that the container had at any moment. It is worth noting that this area would effectively represent the resource footprint of a virtual machine whose resources are allocated and never changed.
With these areas it is easy to see that the ratio of utilization of this serverless framework would be higher than the one achieved by a traditional instance. Moreover, an ideal serverless platform, which allocates only the strictly needed resources at any moment, performing instantaneous scaling operation, would have a ratio of 100% (best-case scenario), while the ratio exposed by not performing any scaling operation, such as with the traditional instance, would be the worst-case scenario.
Quickstart
The Serverless Container framework has been developed to be modular at its core, meaning that it can be scaled and adapted to the number of hosts and containers present in the infrastructure, from a few containers on a single host to dozens of containers spanned across multiple hosts.
In order to show a quickstart with an example of usage, and keep it simple, this scenario will use 2 containers deployed on 1 host, with CPU as the only scaled resource. We will also consider LXD as the technology used to deploy the containers, that the host host0 is network-reachable using such name, and that a CouchDB database is running and accessible as couchdb. It is also required to have resource monitoring and a time series database.
The requirements are overall described on the Deployment Section.
Container Scaler deployment
First, in order to make sure that the containers are properly detected and supported, we have to make sure that the Container Scaler service (deployed on every host) is running.
To do so, we can deploy 2 containers using LXD (in this case spawning an Ubuntu 20.04 distro):
lxc init ubuntu:20.04 cont0
lxc init ubuntu:20.04 cont1
lxc start cont0 cont1
Next, from the framework's folder, start the service:
bash scripts/services/start_node_rescaler.sh
To make sure that the containers are accessible to the service, you can open a web browser and point to the host's IP and the '8000' port and '/container' path. You should see something similar to:
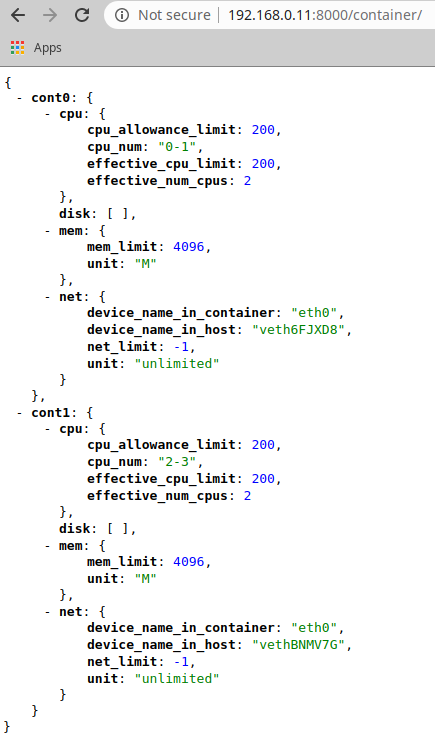
As you can see, the memory, disks and network resources are also reported, but they will be ignored on this guide.
Initializing the container's limit
As of now, the containers could have no limits applied (-1 value) or some predefined limits. Such resource limits can be easily changed through REST API calls to the Container Scaler service. We can do this with the 'curl' command:
curl -X PUT -H "Content-Type: application/json" -d '{"cpu": {"cpu_allowance_limit": "200","cpu_num": "0,1"}}' http://host0:8000/container/cont0
curl -X PUT -H "Content-Type: application/json" -d '{"cpu": {"cpu_allowance_limit": "200","cpu_num": "2,3"}}' http://host0:8000/container/cont1
Although the -d payload can also be taken from a .json file (see the 'NodeRescaler' folder contents).
However, it has to be note that this out-of-band limit changing operation is only intended for initializations or hard and direct limit changes for experimentation reasons, for example.
Initializing State Database
In order to continue with the guide, and before initializing the remaining microservices, we have to initialize the State Database. This is needed considering that the services are configured and tuned via unique documents stored on such StateDatabase. This allows to change their configuration on-the-fly.
To perform this initialization, you can use Python scripts that connect to the database and insert the proper documents, as pre-configured by the user.
To initialize the services with their respective configuration files:
python3 quickstart/StateDatabase/services.py
To initialize the rules that will govern the rescaling policies, as well as the events and requests databases, run:
python3 quickstart/StateDatabase/events_and_requests.py
python3 quickstart/StateDatabase/rules.py
Finally, in order to initialize the containers and the hosts, as well as the container's limit thresholds, run:
python3 quickstart/StateDatabase/limits.py
python3 quickstart/StateDatabase/structures.py
Start the Orchestrator
In order to check that the previous step finished correctly and that all of the necessary documents were stored on the State Database, you can use the Orchestrator service as it exposes an API of the database contents. Start it with:
bash scripts/services/orchestrator/start_tmux.sh
And then check its output by opening a browser with the instance's IP on which the Orchestrator was started, the port '5000' and the path '/structure/cont0' (to see the cont0 structure document). You should see something similar to:
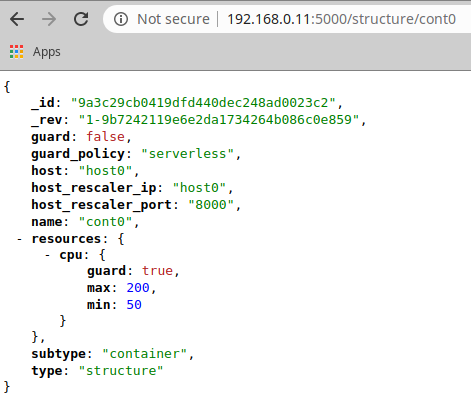
As you can see, the container is registered with resource limits of 50 and 200 for the minimum and maximum values, respectively. It can also be appreciated that its configuration marks it as a non-scalable container (i.e., guard:false), even though the CPU is marked as subjected to be scaled.
The full Orchestrator API can be checked below and it can be used via scripts that perform REST calls.
Using this service and the scripts, we will make sure that both of the containers are set to be left unscaled (unguarded):
bash scripts/orchestrator/Structures/set_to_unguarded.sh cont0
bash scripts/orchestrator/Structures/set_to_unguarded.sh cont1
A return code of 201 ensures that the operation was carried out correctly.
Starting the services
Now that the containers are up and running and that the State Database has been initialized, the remaining microservices can also be started.
First, the passive services should be started (tmux is used to de-attach the program from the terminal and keep the service running):
bash scripts/services/database_snapshoter/start_tmux.sh
bash scripts/services/structure_snapshoter/start_tmux.sh
Both of these services show an output each time they finish a polling operation. The polling time can be configured with their respective configuration documents.
Secondly, the active services can be started:
bash scripts/services/guardian/start_tmux.sh
bash scripts/orchestrator/Guardian/activate_guardian.sh
bash scripts/services/scaler/start_tmux.sh
These services also output what they are doing, processing time windows with a time length that is configurable.
At this point, all of the necessary services would be running, however, nothing would be happening as both of the containers are in an 'unguarded' state, that is, they are being left untouched.
We will deactivate the Scaler service for now:
bash scripts/orchestrator/Scaler/deactivate_scaler.sh
Transitioning the containers to serverless instances
In order to move the containers from following the resource management of a traditional instance, that is, having the initial resources fixed throughout their life-cycle, into a serverless environment, we can use the same scripts as before:
bash scripts/orchestrator/Structures/set_to_guarded.sh cont0
bash scripts/orchestrator/Structures/set_to_guarded.sh cont1
Now, both container are being monitored by the Guardian service and their CPU limits will be scaled according to their internal CPU usage.
However, the Guardian service will only create Requests for resource scaling, either to lower or increase them, but not actual changes will be made to the resource's limits.
In order to apply the Requests as generated by the Guardian service, we will have to rely on the Scaler service. To let it work, we will now activate it:
bash scripts/orchestrator/Scaler/activate_scaler.sh
Now, with all of the services properly working, the serverless environment should be fully functional for the containers.
As seen in the next image, a serverless policy is being applied to the container as its resources are being continuously modified according to the resource usage:
- 1) In the beginning, the CPU is idle so that after enough time passes with the CPU underused, a scaling down operation is performed.
- 2) Later, the CPU is suddenly heavily used to the point that a bottleneck occurs. To fix this, a scaling up operation is performed.
- 3) However, after increasing the resources, the upscale operations gave too many resources and now there is another under-utilization scenario. A second scaling down operation is performed to adjust them.
- 4) The usage fits perfectly between the lower and upper limits so it is under control.
- 5) Finally, the CPU is idle again so that a last scaling down operation is carried out, leaving the allocated resources to the theoretical minimum (minimum + 2 x boundary).
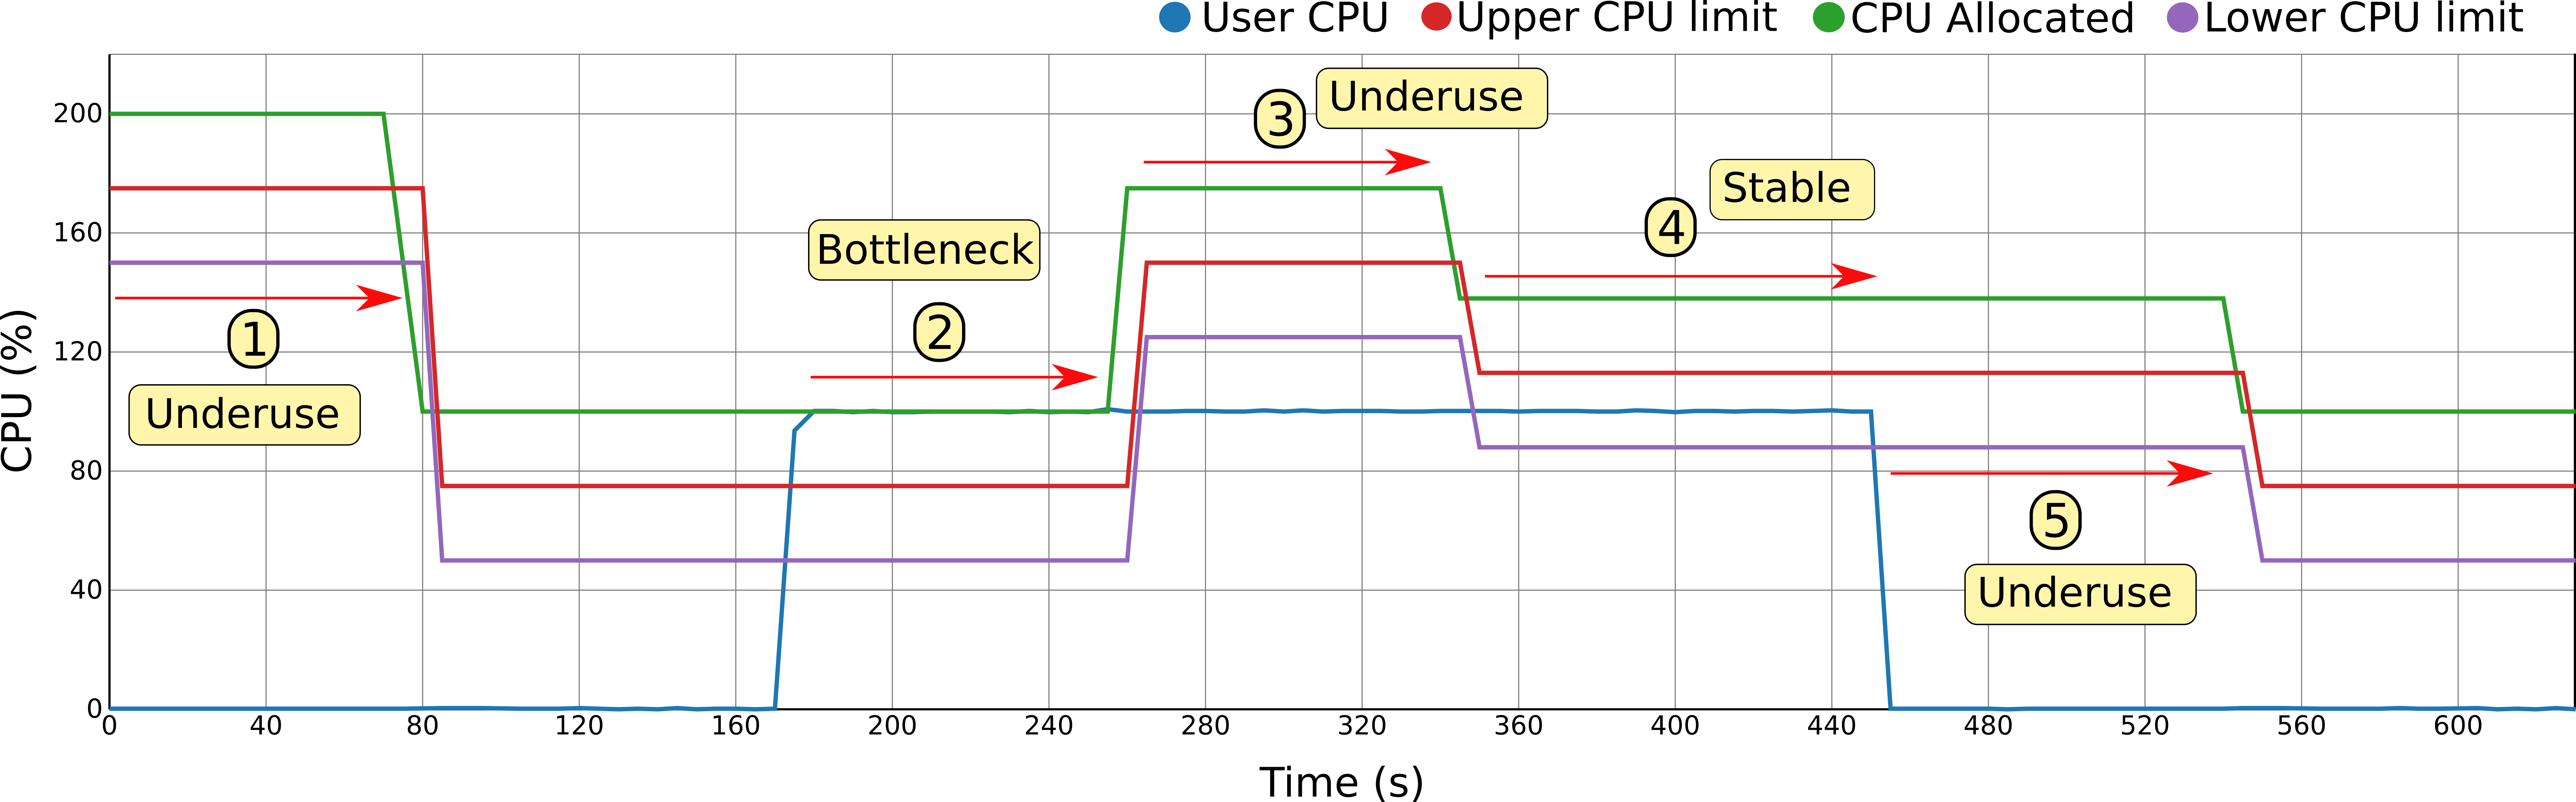
The behavior exposed on the image can be configured and tuned with a few, critical parameters, as explained on the Configuration Section.
Returning the containers to traditional instances
If at any moment we want to stop the scaling from taking place for these containers, we have only to configure the containers to be left alone (unguarded):
bash scripts/orchestrator/Structures/set_to_unguarded.sh cont0
bash scripts/orchestrator/Structures/set_to_unguarded.sh cont1
If at this point we consider that the resource limits are too low, we can always reset them.
Shutting everything down
In order to shut everything down we only have to stop the Python programs running the microservices.
However, it has to be noted that it is possible to implement a 'partial' shut down of the system by only stopping the active services. Even further, the system can be inactivated by only stopping or de-activating the Scaler microservice, something that we effectively did at the end of the Starting the services subsection.
Configuration
The behavior of the Serverless Container framework can be configured to better adapt to the needs of the applications. Such configuration can be even changed dynamically if needed thanks to the design choices.
The configuration can be divided between two dimensions, being the first the time dimension and the second one the resource limit dimension. To better approach these two dimensions, the first one is referred to as the Responsiveness of the framework, while the second one is referred to as the Benevolence.

Responsiveness
As its name implies, this configuration aspect of the framework dictates how fast the changes are made when it comes to adapting the resource limits to the application's real usage. The reason why we have to take into account this, instead of just performing instant scaling operations once the limits have been surpassed, lies behind the concept of hysteresis.
If we consider hysteresis as the degree of variation of the resource usage patterns, we need to take into account some kind of time buffer before changing the resource limits. This time buffer allows to have some assurance that after a scaling operation, another one won't be needed soon after.
As seen on the image below, the responsiveness can be modulated differently to adapt to two possible scenarios:
- A: Time to pass before performing a scaling down operation.
- B: Time to pass before performing a scaling up operation.
It has to be noted the difference between the two. While on the A scenario we can allow more time to pass, as the resources are in the end being underutilized (the application is not being penalized), on the B scenario the application may be close to, or suffering a bottleneck, thus we may consider to shorten such times to avoid execution overheads.

To tune the Responsiveness of the framework, the request-generating Rules will have to be modified.
Benevolence
In the case of Benevolence, as its name says, it modules how the framework addresses the scaling operations in terms of the number of resources that it takes away or that it gives.
On the one hand, a 'benevolent' framework adjusts the resources leaving an ample margin between the limits so that the areas are large enough to accommodate any resource variations, while at the same time giving a large number of resources when scaling up.
On the other hand, if we want to push the serverless scenario to the limit we can set narrower boundaries and more restrained scaling up operations.
As it can be seen on the image below, to module the behaviour between these two options, thus tuning the framework to behave closer to the traditional instance or closer to the serverless paradigm, we can use the following configuration parameters:
- 1) Scaling up amount. A fixed and configurable amount.
- 2) Scaling down policy. Although several are possible, to implement the serverless scenario the only one usable is the 'fit to usage', which looks to set resource limits so that the usage falls between the upper and lower boundaries (stable area).
- 3) Boundary amount. This parameter is used combined with the scaling down policy to define the final allocated resource limit.

To tune the Benevolence of the framework, mainly the amount parameter of the down-scaling Rules will have to be adapted.
Rule configuration
As previously stated, in order to configure the framework on the vertical and time dimensions, the Rule documents have to be modified.
To tune the Responsiveness, we have to modify the request-generating Rules to specify the amount of time windows desired before a scaling request is generated by the Guardian.
As seen in the next Rule document, the number of time windows where the usage had to surpass the upper limits before one of this kind of requests is generated is 4. We can also notice that the number of the opposite event (usage fell below the lower limit) must also be lower than 2. This is done in order to avoid hysteresis, skipping scenarios where the resource usage is highly volatile and constantly crossing both limits.
CpuRescaleUp = dict(
    _id='CpuRescaleUp',
    type='rule',
    resource="cpu",
    name='CpuRescaleUp',
    rule=dict(
        {"and": [
            {">=": [
                {"var": "events.scale.up"},
                4]},
            {"<=": [
                {"var": "events.scale.down"},
                2]}
        ]}),
    events_to_remove=4,
    generates="requests",
    action={"requests": ["CpuRescaleUp"]},
    amount=75,
    rescale_by="amount",
    active=True
)
When it comes to Benevolence, we can also see on the previous Rule document that the amount of CPU increased on a scaling up operation will be 75 shares (i.e., three-quarters of a core).
Finally, in order to configure the boundary parameter, we have to use the Limits documents of each container. On these documents there is a boundary applied for each resource, as seen next:
{
    cpu: {
        boundary: 25,
        lower: 50,
        upper: 75
    }
}
Service configuration
As previously stated, most of the microservices work with polling time windows. The relation between all of the services' time windows may be important, although the framework has been designed to be robust and tend for a behavior akin to an eventual consistency. The next image describes such relationships:

Nevertheless, both the Guardian and the Scaler time window configuration may be worth mentioning:
- Guardian : In this case, the time window directly influences the Responsiveness of the framework, as previously seen the scaling operations are performed by measuring the number of time windows that the resource usage spends on one specific scenario.
- Scaler : When it comes to the Scaler service, it is important that its polling time window is lower than the Guardian service one, as otherwise the Requests could be applied in an unordered fashion.